1. 속성 상속
Vue.js에서 컴포넌트는 부모-자식 관계로 구성될 수 있으며, 자식 컴포넌트는 부모 컴포넌트로부터 다양한 속성이나 메서드를 상속받을 수 있습니다. Vue.js는 컴포넌트 간의 속성 상속을 지원하지 않지만, 대신에 props를 통해 부모 컴포넌트에서 자식 컴포넌트로 데이터를 전달할 수 있습니다.
2. 상속받는 자식 컴포넌트의 루트가 하나일 때
// App.vue
<template>
	<MyBtn class="parent"> Banana </MyBtn>
</template>

<script>
import MyBtn from './components/MyBtn.vue';
export default {
	components: {
		MyBtn,
	},
};
</script>

// MyBtn.vue
<template>
	<div class="btn">
		<slot></slot>
	</div>
</template>

<script>
export default {
};
</script>

<style scoped lang="scss">
.btn {
	display: inline-block;
	margin: 4px;
	padding: 6px 12px;
	border-radius: 4px;
	background-color: gray;
	color: white;
	cursor: pointer;
}
</style>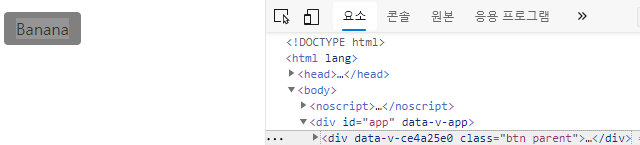
부모 컴포넌트 App에서 자식 컴포넌트 MyBtn에 parent 클래스를 상속이 이루어졌음을 확인할 수 있습니다.
3. 상속받는 자식 컴포넌트의 루트가 여러 개일 때
// App.vue
<template>
	<MyBtn class="parent"> Banana </MyBtn>
</template>

<script>
import MyBtn from './components/MyBtn.vue';
export default {
	components: {
		MyBtn,
	},
};
</script>

// MyBtn.vue
<template>
	<div class="btn">
		<slot></slot>
	</div>
	<h1>Hello Vue</h1>
</template>

<script>
export default {
};
</script>

<style scoped lang="scss">
.btn {
	display: inline-block;
	margin: 4px;
	padding: 6px 12px;
	border-radius: 4px;
	background-color: gray;
	color: white;
	cursor: pointer;
}
</style>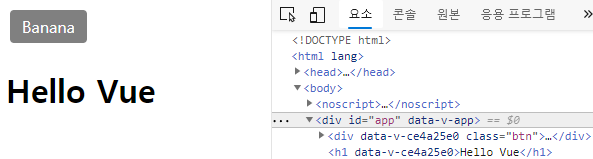
첫 번째 경우와는 다르게 상속받는 자식 컴포넌트 MyBtn에는 루트에 div와 h1 태그 두 개가 존재합니다. 따라서 부모 컴포넌트에서 상속한 class="parent"는 상속되지 않았음을 알 수 있습니다.
4. 자식 컴포넌트에서 부모 컴포넌트 상속을 받고 싶지 않을 때
// App.vue
<template>
	<MyBtn class="parent"> Banana </MyBtn>
</template>

<script>
import MyBtn from './components/MyBtn.vue';
export default {
	components: {
		MyBtn,
	},
};
</script>

// MyBtn.vue
<template>
	<div class="btn">
		<slot></slot>
	</div>
</template>

<script>
export default {
	inheritAttrs: false,
};
</script>

<style scoped lang="scss">
.btn {
	display: inline-block;
	margin: 4px;
	padding: 6px 12px;
	border-radius: 4px;
	background-color: gray;
	color: white;
	cursor: pointer;
}
</style>
위 코드와 같이 상속 받는 자식 컴포넌트에 inheritAttrs 옵션을 false로 설정해 두면 부모 컴포넌트로부터 상속을 받지 않습니다.
5. 상속받는 자식 컴포넌트의 루트가 여러개일 때 상속받는 법
// App.vue
<template>
	<MyBtn class="parent" style="color: red" title="Hello Vue"> Banana </MyBtn>
</template>

<script>
import MyBtn from './components/MyBtn.vue';
export default {
	components: {
		MyBtn,
	},
};
</script>

// MyBtn.vue
<template>
	<div class="btn">
		<slot></slot>
	</div>
	<h1 v-bind:class="$attrs.class" v-bind:style="$attrs.style">Hello Vue</h1>
	<h1 v-bind="$attrs">Hello Vue</h1>
</template>

<script>
export default {
	inheritAttrs: false,
	created() {
		console.log(this.$attrs);
	},
};
</script>

<style scoped lang="scss">
.btn {
	display: inline-block;
	margin: 4px;
	padding: 6px 12px;
	border-radius: 4px;
	background-color: gray;
	color: white;
	cursor: pointer;
}
</style>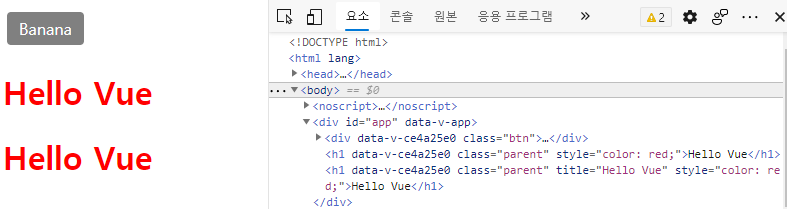
자식 컴포넌트 루트에 위치한 엘리먼트가 여러개 일 때 상속받는 법에 대해서 설명하겠습니다. 먼저 라이프 사이클에서 created 될 때 즉, 인스턴스가 생성 직후에 $attr을 console에 출력해 보면 다음과 같이 출력됩니다.

이 $attr 객체를 위 코드와 같이 사용할 수 있습니다. v-bind:class, v-bind:style같이 class와 style에 바인딩하여 사용할 수 있고 v-bind="$attr"로 상속받은 속성 객체 자체를 바인딩해줄 수도 있습니다.
참고 문서:
'Front-end > Vue' 카테고리의 다른 글
| Vue.js) 컴포넌트 - Slot (3) | 2024.07.30 |
|---|---|
| Vue.js) 컴포넌트 - Emit (0) | 2024.07.30 |
| Vue.js) 컴포넌트-기초 (0) | 2024.07.29 |
| Vue.js) v-model 수식어 (1) | 2024.07.29 |
| Vue.js) 폼 입력 바인딩 (1) | 2024.07.29 |


